As an avid traveler, there's nothing quite like the freedom of hitting the open road in your RV. However, to truly enjoy the comforts of home while on the go, a reliable power source is essential. This is where a quality RV inverter comes into play.
In this comprehensive guide, we'll walk you through everything you need to know about RV inverter installation, ensuring that you can power your adventures with ease.
Before delving into the installation of an RV inverter, let's first discuss the various types of power and their respective sources that are utilized in RV electrical systems. There are two primary types of power used in RVs. The first is Alternating Current (AC) at 120V, which is typically obtained from a "shore power" hookup— an external power source connected to the electrical grid. When you arrive at a campsite with electrical service and connect your RV to it, the fridge and all electrical outlets will operate just as they would at home.
The second system is Direct Current (DC), usually at 12V, which is powered by the auxiliary battery bank (also known as service or house batteries) in your RV. DC power is commonly used to operate lights, vent fans, radios, slide-out motors, power awnings, and USB outlets, among other things. However, if you want to operate both AC and DC appliances while off-grid, you'll need an inverter. For more information about DC and AC, refer to another article: The Complete DC To AC Converter Guide.
What Does an Inverter Do? How is it Different from a Converter?
Most RV manufacturers install a "converter" in the RV's electrical system so that your auxiliary battery can charge while you are connected to shore power— it converts AC power to DC power. Related reading: 4 Signs To Know If RV Converter Is Charging Battery
Conversely, an inverter performs the opposite function of a converter; it converts DC power from your battery to AC power, allowing you to operate AC appliances when you are not connected to shore power. Unless otherwise specified, most RV manufacturers do not include an inverter in the factory electrical system. If you intend to boondock (also known as dry camp) with your RV away from the power grid and full-hookup campsites while still operating some or all of your AC appliances, you will need an inverter.
The highest quality inverters are pure sine wave inverters, as they most accurately replicate the specific type of AC power supplied by the electrical grid. Many modern electrical appliances, such as laptops, require specific parameters of AC power and could be damaged if connected to a different type of inverter.
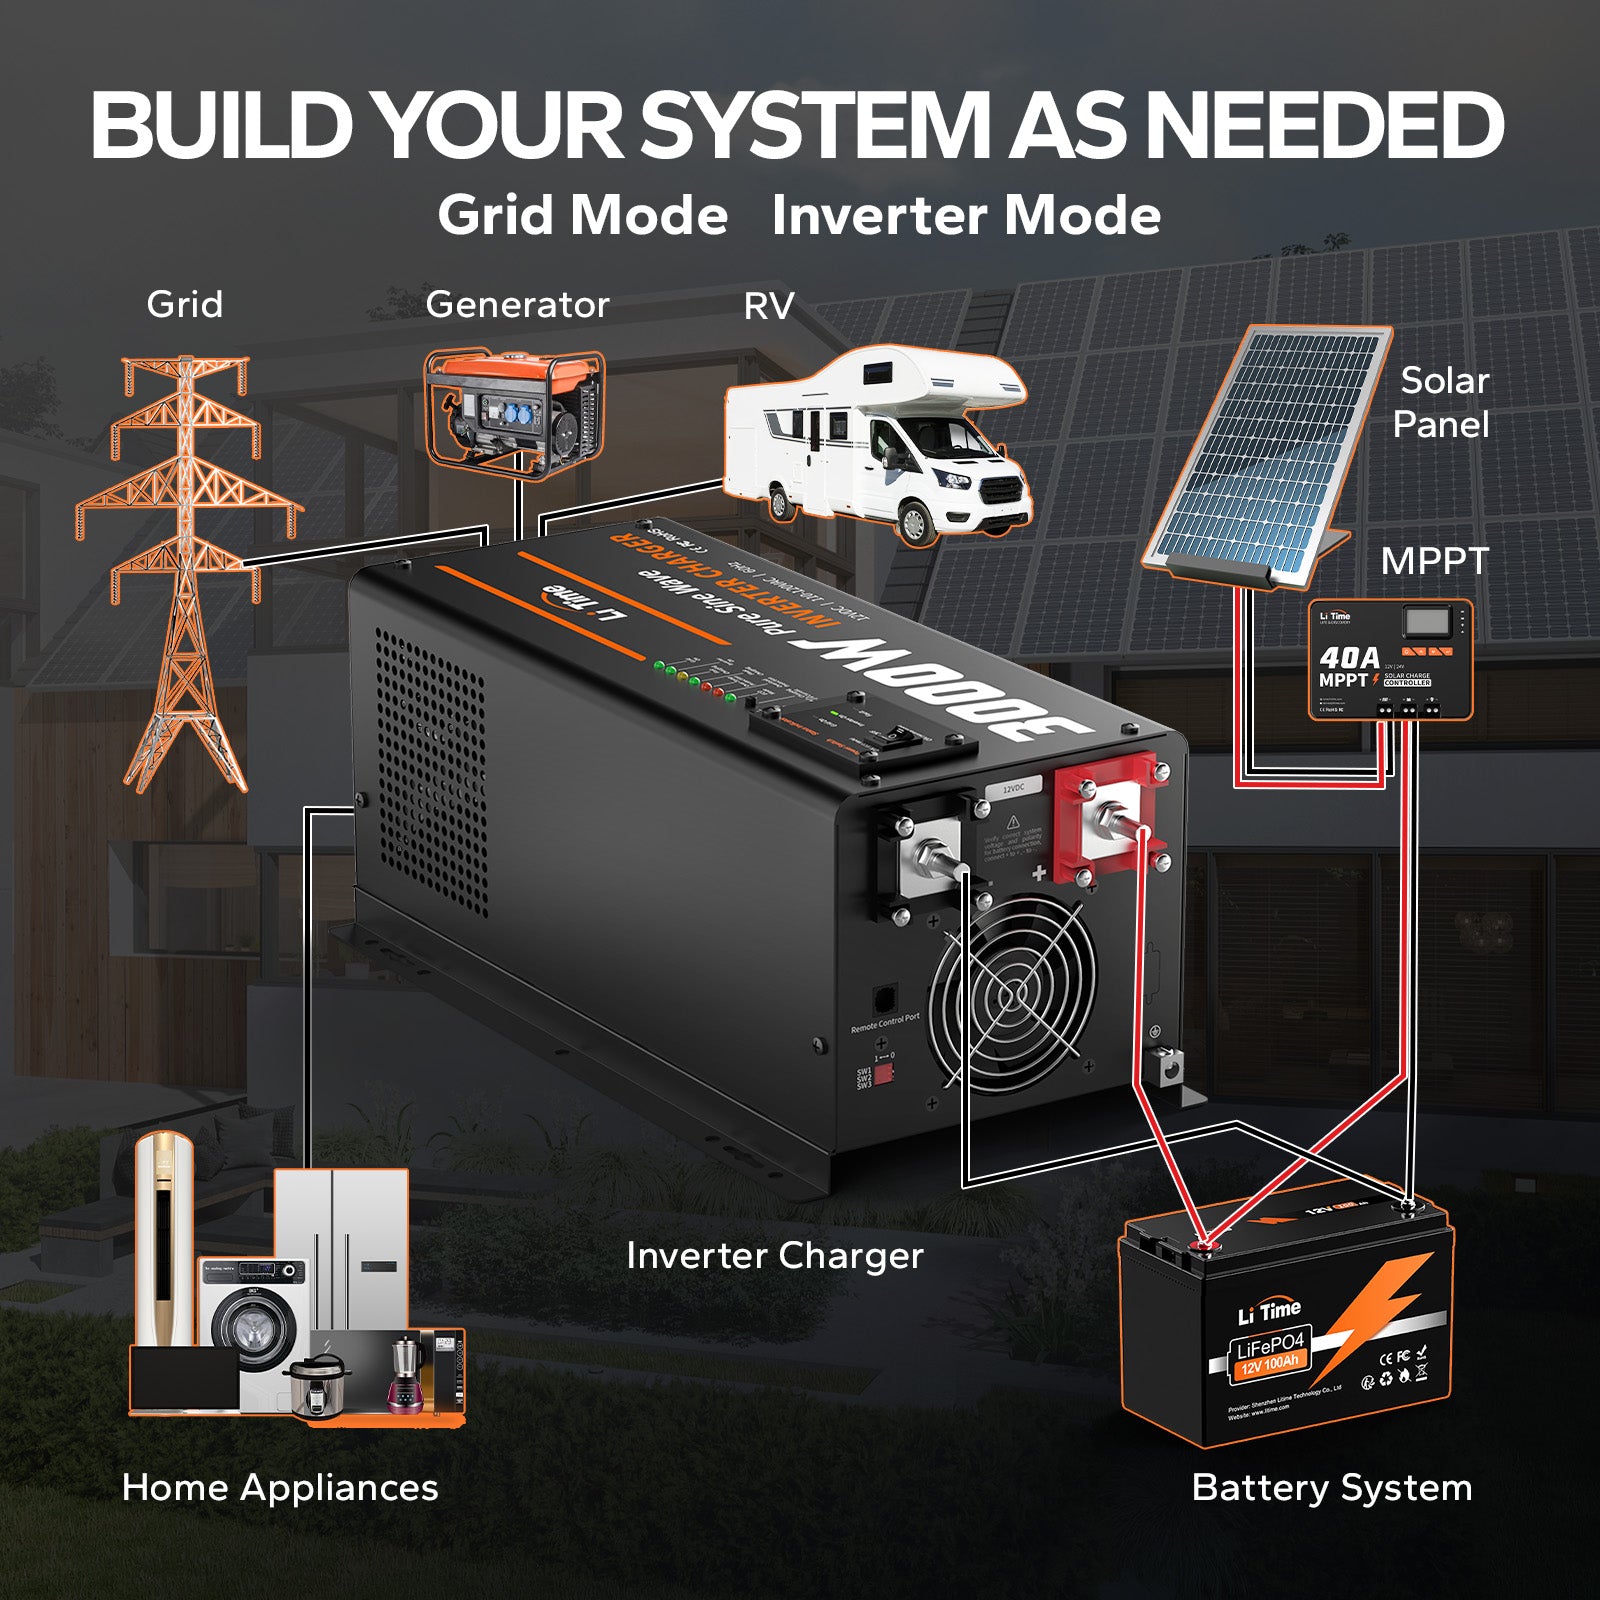
LiTime offers two types of pure sine wave inverters available in a range of wattages:
1. Battery Inverters
The LiTime battery inverters are designed to simply convert DC power to AC power, enabling the operation of typical household appliances in your RV. LiTime's line of battery inverters can handle loads of up to 1000W, 2000W, and 3000W respectively. As the capacity increases, so does the price and the amount of power the inverter requires to operate.
2. Inverter Chargers
Inverter chargers, often referred to as “through inverters,” serve the dual purpose of functioning as both a battery inverter and a converter within a single unit. They not only convert DC power from batteries into AC power but also charge the batteries using shore power when plugged into an electrical outlet. Due to their complexity, these devices tend to be more expensive than standard battery inverters.
Choosing an inverter charger is particularly beneficial if you are upgrading from any type of lead-acid battery—whether flooded, gel, or AGM—to Lithium Iron Phosphate (LFP) batteries, especially if your current converter is incompatible with LFP charging requirements. It’s worth noting that only RVs manufactured in recent years typically come with converters that support LFP batteries, so it’s essential to verify your specifications if you intend to charge your batteries from shore power using your existing setup.
LiTime offers a range of inverter chargers capable of handling loads of up to 3000W, along with a specialized 3500W solar inverter charger designed for 48V systems. As the capacity of these units increases, so does their price, along with the power required for their operation.
Type of Inverter that Works Best for RV
The type of inverter that works best for your RV depends on your specific power needs and usage scenarios. Here are a few considerations to help you determine the best type of inverter for your RV:
1. Power Requirements: Consider the total wattage of the appliances you intend to power with the inverter. This will help determine the wattage capacity you need from the inverter. Make a list of all the AC appliances you plan to use while off-grid and calculate their combined power consumption to determine the appropriate inverter size.
2. Appliance Compatibility: Some sensitive electronic devices such as laptops, TVs, and certain kitchen appliances may require a pure sine wave inverter to operate efficiently and avoid potential damage. If you plan to use such devices, a pure sine wave inverter is recommended.
3. Charging Needs: If you want an inverter that not only provides AC power but also charges your batteries from shore power, an inverter charger may be the best option. This is especially important if you are considering upgrading your batteries to Lithium Iron Phosphate (LFP) and need a compatible charging system.
4. Budget and Space Constraints: Consider your budget and the physical space available for the inverter installation. Inverter chargers are typically more expensive and larger in size compared to standard battery inverters. Assess your budget and available space to determine the best fit for your RV.
5. Future Expansion: If you anticipate adding more appliances or increasing your power needs in the future, it might be wise to invest in a higher capacity inverter to accommodate potential upgrades without needing to replace the inverter later on.
6. Manufacturer and Quality: Choose a reputable manufacturer like LiTime known for producing reliable inverters. Look for features such as overload protection, efficiency, and warranty coverage.
By considering these factors, you can determine the type and capacity of the inverter that will work best for your specific RV setup and power requirements.
If your off-grid stays are limited to a few nights per week and you're open to reducing the number of appliances used during those times, a relatively small inverter may suffice, similar to the one we currently have. However, if you aim to live predominantly off-grid without compromising your typical AC power usage, then you'll require an inverter capable of handling a significantly larger load. The extent of appliances you can operate is determined by your space limitations, the size of your battery bank, and, naturally, your budget.
To determine the appropriate inverter size, calculate your AC load, which represents the combined wattage of all the AC appliances you intend to run simultaneously. For instance, if you plan to simultaneously operate your laptop, coffee maker, TV, and blender, totaling 1550W, add an additional 25% of 1550W for a safety margin (1550 x 1.25 = 1937.50). In this case, you would need to invest in a 2000W inverter to manage this load. If the total adds up to 850, a 1000W inverter would likely suffice.
Should you aim to power a 10-15K BTU RV air conditioner (even for a brief period), you would typically require at least a 3000W inverter and a sizable battery bank. In this situation, you might also want to think about installing a higher voltage system, such as a 24V or 48V setup.
Considerations for Installing an Inverter in an RV
Safety First: AC power can be hazardous. If you feel uncertain about handling power sources, it's advisable to seek assistance from a licensed electrician or solar power installer.
When installing an inverter in your RV, one of the initial decisions is whether to establish separate circuits or fully integrate the inverter into the RV's electrical system. Most LiTime inverters offer two types of AC output terminals: hard-wired terminals for AC wiring and standard household GFCI outlets. You can integrate the inverter's output into your RV's AC breaker box using the hard-wired AC output terminal, or opt for a simpler solution by utilizing the GFCI outlets and connecting the inverter to an extension cord or single household outlet.
Option 1: Establishing Separate Circuits with a Dedicated GFCI Outlet (Using Battery Inverter)
This can be achieved in two ways. The simpler method involves plugging an extension cord into the inverter to power any AC appliance when it's activated. Alternatively, you can wire a dedicated outlet directly to the inverter, ensuring that these outlets only function when the inverter is operational.
For instance, the LiTime 1000W inverter distributes 110V of AC power to two standard household outlets within the camper via a basic extension cord. This separate AC wiring circuit is distinct from the original electrical circuit in the camper, which initially featured a single 120V household outlet powered by plugging in the extension cord to a shore power source.
Option 2: Full Integration via Hard Wiring + Transfer Switch (Using Battery Inverter)
To connect the inverter to the RV electrical distribution panel, a transfer switch must be installed. Without this switch, plugging your RV into shore power with the inverter connected could permanently damage the inverter due to reverse power flow. The transfer switch isolates the inverter from the shore power source and allows it to switch back to inverter power when shore power is unplugged.
It's crucial to install the transfer switch in a split distribution panel, ensuring that the inverter and converter are on separate parts of the board to maintain their isolation.
Option 3: Full Integration via Hard Wiring (Using Inverter Charger)
This option incorporates an integrated automatic transfer switch, eliminating the need for additional wiring and a separate switch. Instead of isolating shore power and inverter sources separately, the inverter charger becomes part of the integrated circuit. When connected to shore power, 120V AC passes through the inverter to the AC distribution panel; when off-grid, the inverter draws power from the battery and provides AC power to the distribution panel. A diagram for RV inverter charger wiring is provided below.
Step By Step Guide on How to Install Inverter
Important Safety Reminder: Before beginning any installation, ensure your RV is completely disconnected from all power sources. This includes unplugging shore power, disconnecting solar panels from the charge controller, and turning off or disconnecting the battery bank—especially if using a smart battery. These steps are critical to eliminate the risk of electrical shock or damage during installation.
1. Selecting the Right Location for Your Inverter
Inverters generate heat as they operate, which makes proper ventilation essential for both performance and safety. Check the inverter's manual for specific clearance requirements around the intake and exhaust vents. These recommendations often vary based on the unit's size and power rating. Adequate airflow helps prevent overheating, prolonging the life of your inverter.
2. Ensure Proximity to Battery Bank
To minimize voltage drop, install the inverter close to the battery bank. However, the type of battery you're using matters. If you’re working with flooded lead acid batteries, avoid placing the inverter in the same compartment—these batteries can release flammable gases during charging, posing a fire risk if ignited by inverter circuitry. For sealed battery types, such as Gel, AGM, or Lithium Iron Phosphate (LiFePO4), shared compartments are generally safe.
3. Securing the Inverter
Before mounting the inverter, consider connecting all required wires, especially if working in a compact space like a van or small RV compartment. Most inverters come with factory-drilled mounting holes, simplifying the process. Once positioned, double-check that you’re maintaining the required ventilation clearances as specified by the manufacturer.
4. Grounding the Inverter
Proper grounding is essential for safety and compliance. Your inverter will feature a grounding lug—typically a bolt or screw. Attach a ground wire to this lug, then secure the other end to your RV’s common ground point. This could be located under the trailer’s frame or on a designated bus bar inside your electrical system. Always consult your user manual for location specifics and grounding wire requirements.
5. Connecting DC Cables
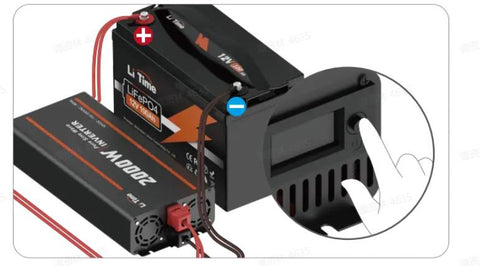
LiTime inverters, for example, come equipped with appropriately sized red (positive) and black (negative) DC cables. These cables connect directly to your battery terminals. Follow the polarity markings carefully to avoid short circuits or system damage.
Avoid direct contact between the terminals of positive and negative wires connected to the battery, and do not reverse the positive and negative connections.
Step 1: Connect the included wires to the battery terminals.
Step 2: Make sure the intverter is in the OFF status. Considering the safety, this step is really important.
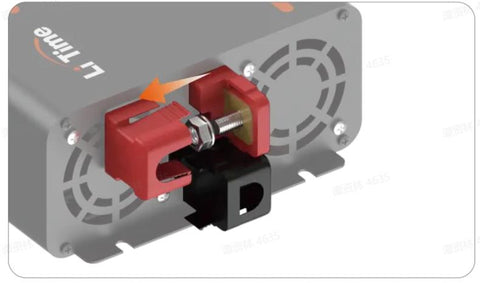
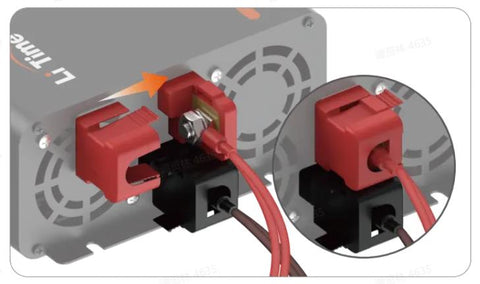
Step 3: Remove the insulating caps on the terminals, and unscrew the metal hexagon nuts with flange from the bolts.
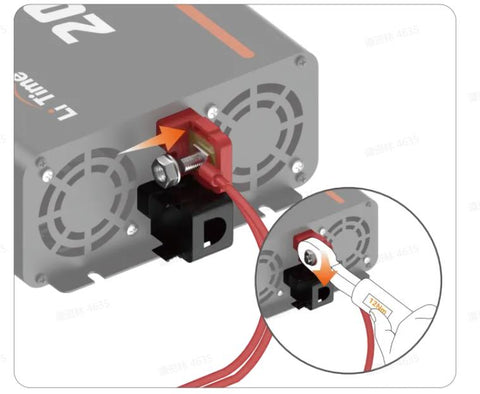
Step 4: Attach the wire lugs and metal hexagon nuts with flange to the bolts in the following sequence: Wire Lug → Metal Hexagon Nut with Flange.
Use a torque wrench to tighten the nuts to the bolts under the 12N·m to 14N·m setting to connect the wires to the inverter, positive to positive; negative to negative.
Step 5: Put on the insulating caps.
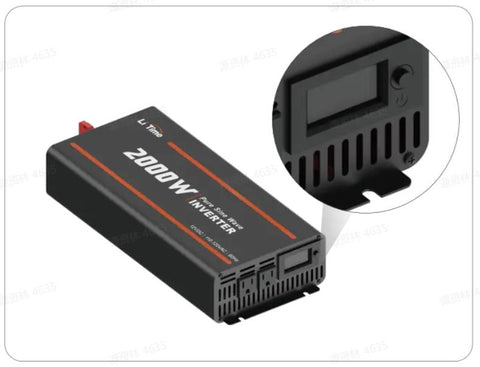
Step 6: Turn ON the inverter power, the monitoring screen will light up assuming proper battery connection, and the inverter is now ready for use.
Connecting to Devices
Make sure the inverter is in the OFF position before connecting loads (electronic devices) to the AC outlets.
Avoid switching on the inverter with the load already turned on. This may trigger an overload since some electronic devices have an initial high power surege to start.
Be sure to turn off all loads first before switching off the inverter. Even if the inverter is turned off, the capcacitors will still have a charge, so the DC and AC terminals must be disconnected if altering the circuitry.
Conclusion
With the information provided in this guide, you'll be well-equipped to install and make the most of your RV inverter, empowering you to enjoy the comforts of home no matter where your adventures take you. Whether you're a seasoned RVer or new to the lifestyle, a reliable inverter is a game-changer, and with the right knowledge, installing one can be a straightforward and rewarding experience. Safe travels and happy adventuring!
John Marius
John Thompson, an automotive engineer with 15+ years of EV and lithium battery experience, holds a Master’s in Electrical Engineering from Stanford. He’s passionate about advancing battery tech and promoting green energy.


 Classic
 Bluetooth
 Low-Temp
 Self-Heating
 2C-Rate
 Starting
 Waterproof
 Multi-Bank