5 Ways to Charge Trolling Motor Batteries While on the Lake

Trolling motors are essential tools for anglers seeking efficient and quiet propulsion on the water. However, ensuring that your trolling motor batteries—whether cranking or deep cycle—remain charged while out on the lake can be a concern, especially during extended fishing trips.
In this article, we'll explore effective methods for charging trolling motor batteries while on the lake, allowing you to optimize your time on the water without worrying about battery depletion.
How To Charge Trolling Motor Batteries on the Water
Picture this scenario: you're out in the middle of a vast lake or ocean when suddenly your trolling motor gives out. Upon investigation, it becomes apparent that your battery is either low on charge or completely dead. What do you do next? This experience is not uncommon, and many anglers have encountered the frustration of a fishing trip being abruptly halted due to a dead trolling motor battery. It can be disheartening to find yourself in such a situation without a means to recharge the battery. However, there are methods available to revive a dead trolling battery.
1.Solar Panels
Solar panels likely the best for the most. Charging trolling motor batteries using solar panels while on the lake is a sustainable and convenient method to keep your batteries powered. Here's a simple guide to achieving this:
Choose the Right Solar Panel: Select a solar panel suitable for charging marine batteries. Ensure it has sufficient wattage to generate the required power for your trolling motor batteries. Flexible and lightweight solar panels like LiTime 100 Watt Monocrystalline Portable Solar Panel are ideal for this purpose.

Secure the Solar Panel: Position the solar panel on the deck of your boat, ensuring it receives direct sunlight. Keep it securely fastened to prevent movement while the boat is in motion.
Connecting Charge Controller to the Batteries: Connect the charge controller to your trolling motor batteries using the appropriate wiring and connectors. This allows the solar panel to effectively charge the batteries without risk of damage due to overcharging or improper voltage.
Connect the Solar Panel to a Charge Controller: Use a charge controller or regulator to manage the power flow from the solar panel to the batteries. This device prevents overcharging and regulates the voltage and current to protect the batteries.
Monitor and Maintain: Regularly check the connections and the charge controller to ensure everything is functioning effectively. Keep the solar panel clean and free from debris to maximize its efficiency in harnessing sunlight.
2. Utilizing an Onboard Charger
If your boat is equipped with an onboard charger, it serves as an excellent solution as it remains connected to the battery system. An onboard charger effectively prevents the unwelcome surprise of a dead trolling motor battery.
3. Invest in a Portable Marine Battery Charger
3.A portable marine battery charger is an indispensable tool for charging trolling motor batteries while on the lake. Look for a charger specifically designed for marine batteries, as they are built to withstand the rigors of aquatic environments. These chargers are typically compact, lightweight, and equipped with features that make them suitable for use on boats. When selecting a charger, consider its amperage capacity, versatility, and compatibility with your trolling motor battery type.
4. Implement a Dual Battery Setup
4.Consider installing a dual battery setup on your boat to ensure continuous power for your trolling motor. This configuration involves using one battery for running the trolling motor while the other is reserved for charging. When the motor is not in use, the charging battery can replenish the power of the trolling motor battery. This method allows you to rotate the use of batteries, ensuring that you always have a fully charged power source available.
5. Utilize a Trolling Motor Alternator
Some trolling motors are compatible with alternator systems, which generate electricity as the motor operates. This electricity can be used to charge the trolling motor batteries directly, providing a convenient and efficient way to maintain their charge while on the lake. Trolling motor alternators are designed to seamlessly integrate with the motor's operation, enabling continuous charging without the need for manual intervention.
6. Practice Energy-Efficient Trolling Motor Use
Conserving battery power is essential for extending the runtime of trolling motor batteries while on the lake. Employ energy-efficient practices such as using lower speed settings, maintaining a steady course, and minimizing abrupt changes in speed. By being mindful of your power consumption, you can prolong the usage time of your trolling motor batteries before needing to recharge them.
Upgrade Lithium Trolling Motor Batteries to Enjoy Extra-Long Experience
Enhancing your trolling motor setup with lithium batteries can significantly improve your experience on the water. Here are the key benefits and considerations for upgrading to lithium trolling motor batteries:
Benefits of Upgrading to Lithium Trolling Motor Batteries:
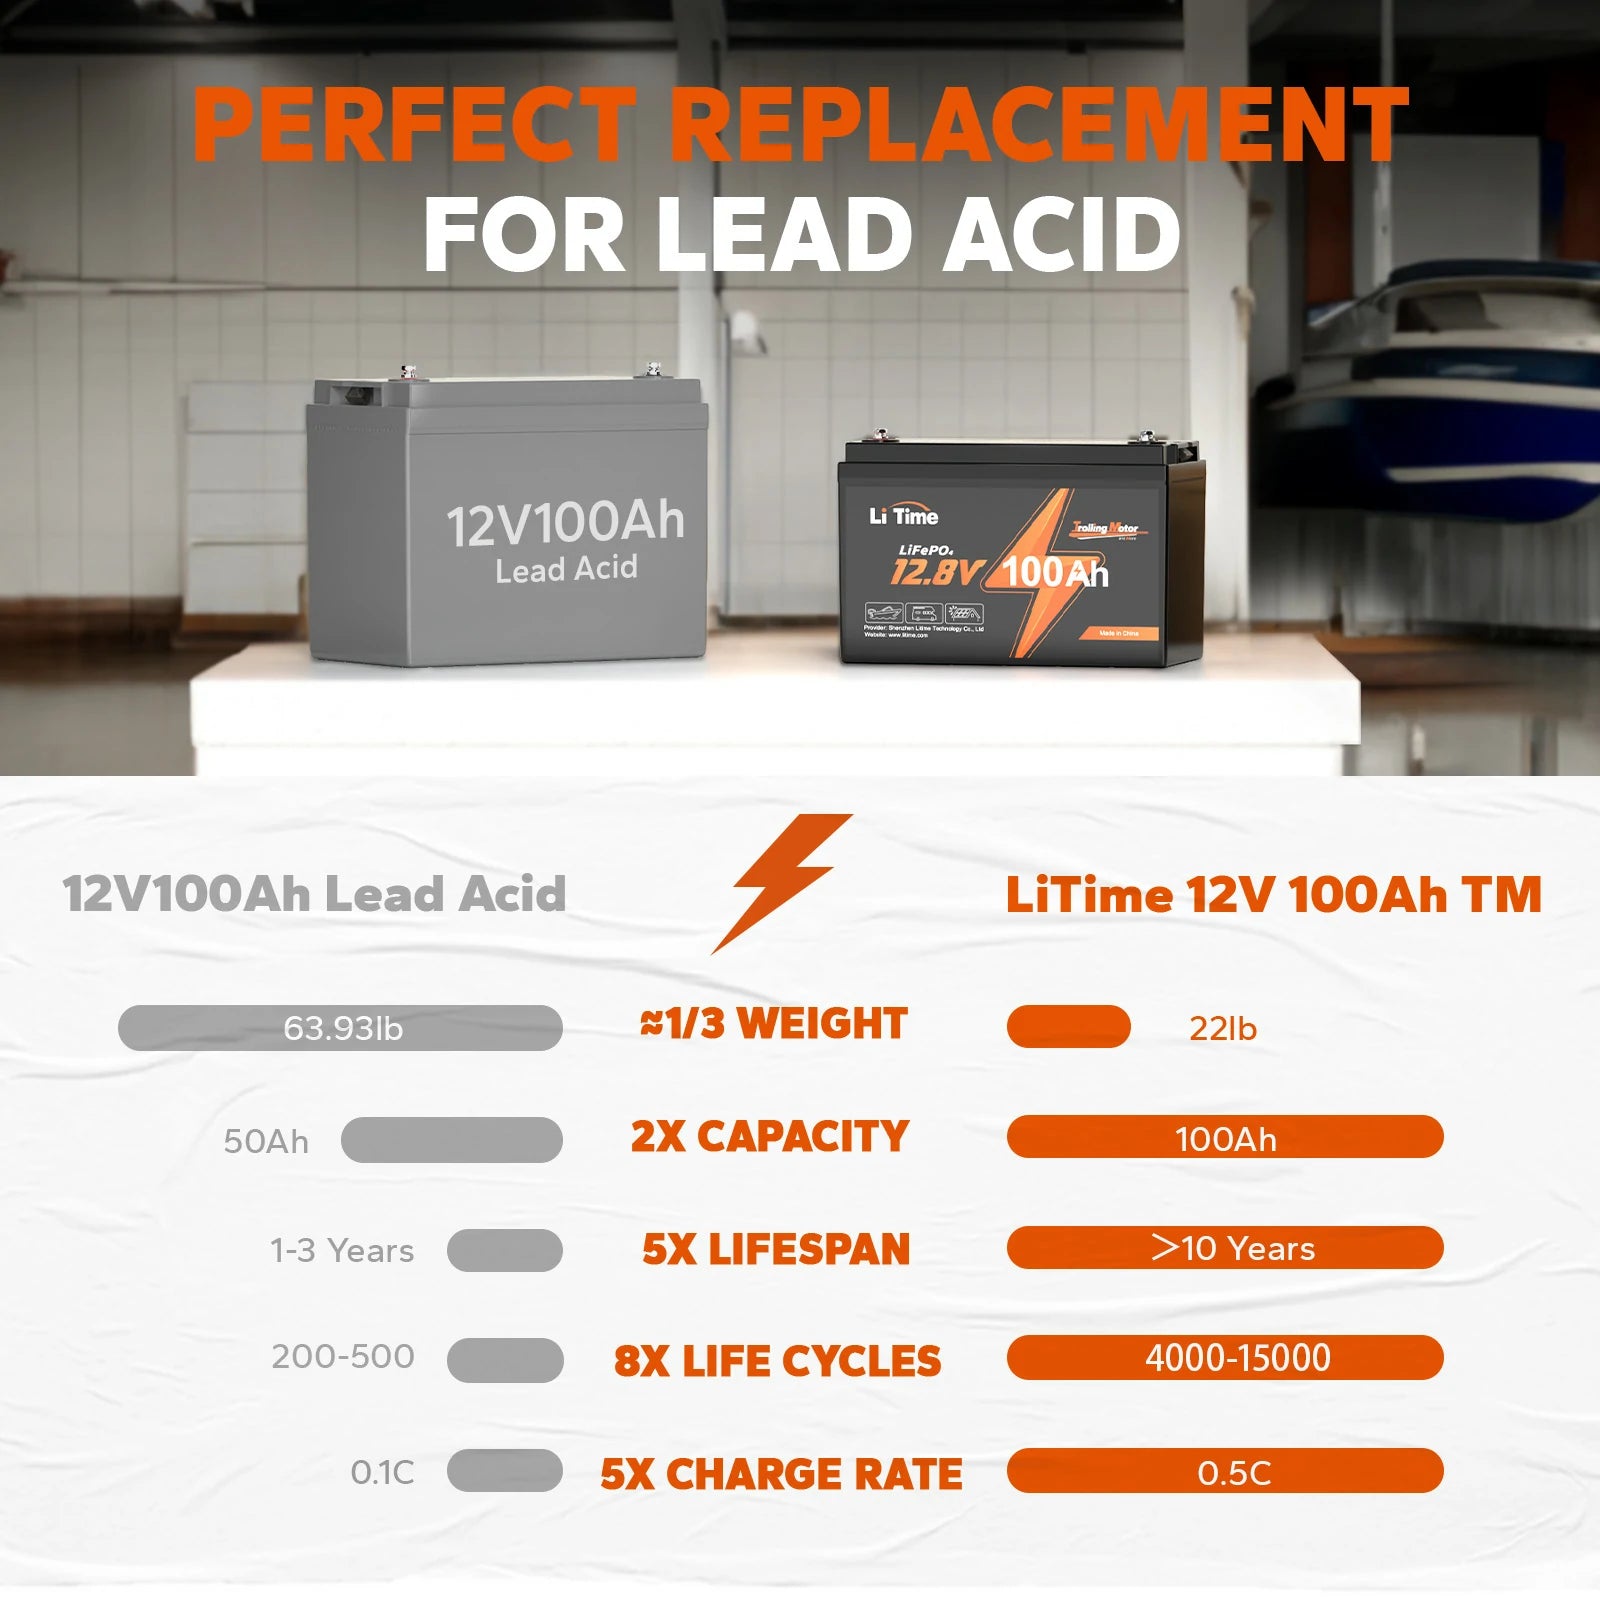
Lightweight: Lithium batteries are generally lighter than traditional lead-acid batteries, reducing the overall weight of your boat and making transportation and handling easier. For example, LiTime 12V 100Ah lithium battery weights only 22lbs.
Greater Energy Density: Lithium batteries offer higher energy density, providing longer runtimes and increased efficiency compared to lead-acid alternatives. This means you can stay out on the water for extended periods without worrying about running out of power.
Faster Recharge: Lithium batteries typically charge more quickly than lead-acid batteries, allowing for shorter downtime between uses and enabling you to get back on the water sooner. Read on How to Charge Trolling Motor Batteries for more information about charging trolling motor batteries.
Longevity: Lithium batteries offer an extended lifespan and the ability to withstand a higher number of charge cycles when compared to conventional batteries, delivering greater long-term value. For instance, LiTime lithium batteries boast a life cycle ranging from 4000 to 15000 cycles, indicating they can remain operational for over a decade.
Conclusion
In conclusion, optimizing the charging methods for trolling motor batteries while on the water is crucial for maintaining an uninterrupted and enjoyable fishing experience. From utilizing solar panels and onboard chargers to portable marine battery chargers and innovative dual battery setups, there are various efficient strategies to ensure a constant power supply for your trolling motor.
Additionally, incorporating energy-efficient trolling motor practices and considering an upgrade to lightweight and high-performance lithium batteries like LiTime lithium trolling motor batteries can significantly prolong your time on the water, offering extended runtimes, faster recharges, and long-lasting reliability. By implementing these charging solutions and exploring advanced battery options, anglers can upgrade their boating experience and maximize their time spent fishing without the concern of battery depletion.


