


Switching your RV from traditional lead-acid batteries to lithium power isn’t just an upgrade — it’s a complete transformation of how you camp, travel, and live off-grid. For RV owners who value reliability, longevity, and energy independence, lithium batteries have become the new standard.
This in-depth guide from LiTime walks you through everything you need to know to successfully convert your RV to lithium batteries — from understanding the “why” and planning your setup, to installation, optimization, and long-term care.
Part 1:Why Convert to Lithium Batteries in Your RV?
1. Unmatched Energy Efficiency
Traditional deep-cycle lead-acid batteries typically allow only 50% of their capacity to be used before recharging is required. In contrast, LiFePO₄ (lithium iron phosphate) batteries can safely deliver 80–100% of usable capacity. That means you can draw nearly double the energy from the same rated amp-hour size.
Example:
- A 100Ah lead-acid battery offers about 50Ah usable.
- A 100Ah lithium battery delivers nearly 100Ah — giving you 2x runtime without increasing space or weight.
2. Lightweight Yet Powerful
Lithium batteries weigh roughly 40–60% less than their lead-acid counterparts. Reducing weight in your RV means better fuel efficiency, improved handling, and less strain on your suspension and tires.
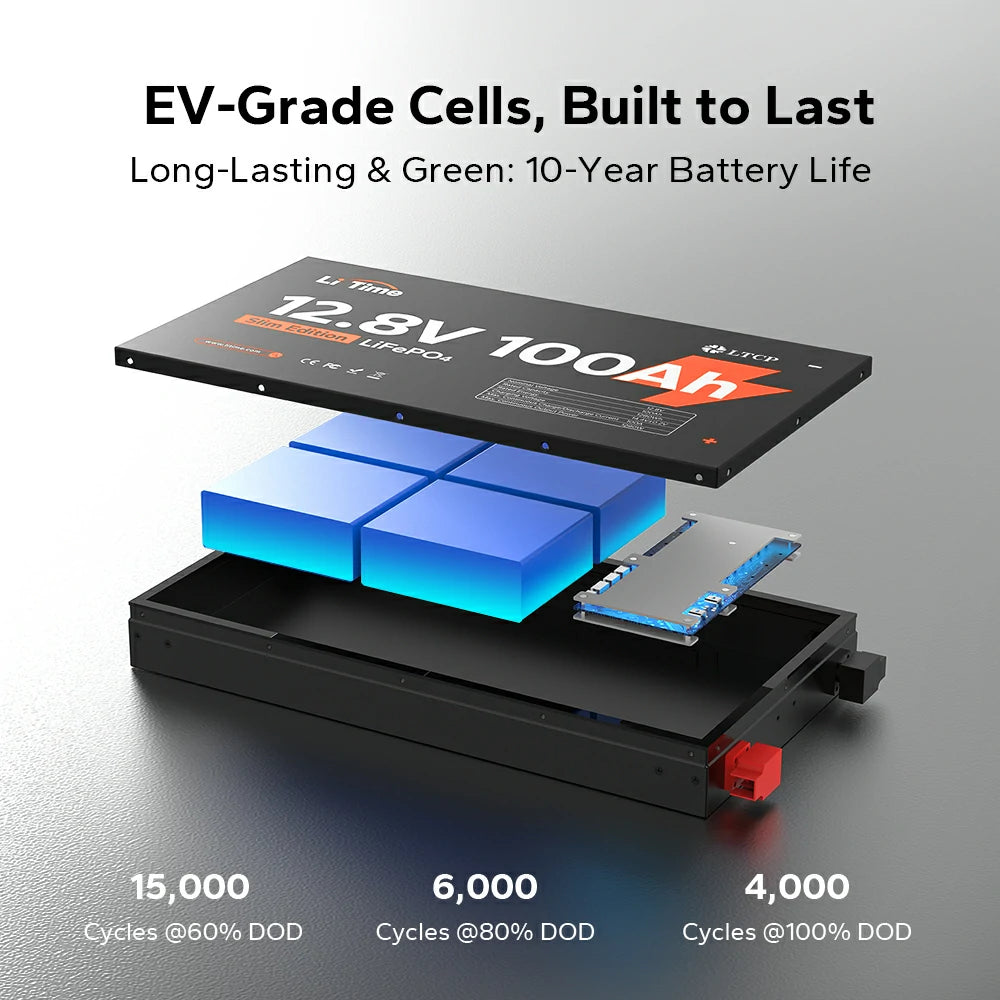
3. Long Lifespan
High-quality lithium batteries like those from LiTime easily reach 4,000–15,000 cycles, while flooded lead-acid types often degrade after 300–500 cycles. This translates to 10 years or more of dependable service for full-time RVers.

4. Faster, Smarter Charging
Lithium batteries charge up to 5x faster due to higher charge acceptance rates. They’re also compatible with solar, alternator, and generator systems when properly configured.
5. Maintenance-Free Operation
Forget topping off water levels or worrying about sulfation. LiFePO₄ batteries are sealed, maintenance-free, and include integrated Battery Management Systems (BMS) that handle balancing and protection automatically.
6. Cost Over Time
While the initial investment is higher, the lifetime cost per cycle of lithium batteries is substantially lower — making them more economical long term.
💡 Pro Tip: If you boondock frequently or rely on solar power, lithium batteries can cut your generator time by more than half.
Part 2: Planning Your RV Lithium Conversion
Before purchasing or installing anything, careful planning ensures safety, compatibility, and performance.
1. Assess Your Energy Needs
Start by listing every 12V and 120V device you power: lights, refrigerator, fans, furnace blower, water pump, microwave, coffee maker, air conditioner, inverters, laptops, TVs, routers, etc.
| Device | Watts | Hours/day | Watt-hours/day |
|---|---|---|---|
| LED lights | 40 | 5 | 200 |
| Refrigerator | 60 | 10 | 600 |
| Laptop | 100 | 2 | 200 |
| Water pump | 50 | 1 | 50 |
| Total | 1050 Wh/day | ||
Divide total watt-hours by 12V to estimate amp-hours per day.
1050 ÷ 12 = 88Ah/day.
Add 30% reserve capacity → target around 115Ah/day usable energy.
For 3 days off-grid: 115Ah × 3 = 345Ah total battery capacity.

2. Check Existing Components
- Converter/Charger: Many older RV converters are optimized for lead-acid profiles. Lithium requires a charger capable of 14.2–14.6V absorption voltage.
- Wiring: Verify adequate wire gauge for new current loads. Undersized cables cause voltage drop and inefficiency.
- Monitoring System: Consider upgrading to a lithium-compatible monitor that tracks voltage, current, and State of Charge (SOC).
- Fuses and Disconnects: Ensure protection is rated for higher currents lithium systems can handle.
3. Verify Compatibility of Solar & Alternator Charging
If your RV uses solar, check if the charge controller supports lithium charging profiles (MPPT controllers typically do). For alternators, many require a DC-DC charger to prevent alternator overheating when charging low internal resistance lithium banks. Confirm generator or shore power chargers output the correct voltage and cut-off levels.
4. Safety & Certification Considerations
Lithium batteries are extremely safe when properly designed and certified. Look for units with:
- LiFePO4 chemistry (more thermally stable than other lithium types)
- UL1973 / CE / UN38.3 certifications
- Integrated BMS for overcharge, over-discharge, and temperature protection

Part 3: Selecting the Right Lithium Battery System
1. Chemistry & Structure
LiFePO₄ (Lithium Iron Phosphate) is the preferred chemistry for RVs because of high cycle life, stable thermal characteristics, built-in safety, and more benign materials. Avoid “generic lithium-ion” batteries without clear labeling — these are often designed for portable electronics, not high-capacity RV use.
2. Voltage Configuration
Most RV systems operate on 12V DC, but higher-end setups may run 24V or 48V for efficiency.
- 12V System: Most common and easiest retrofit. Compatible with most RV appliances.
- 24V System: Reduces current draw, allowing smaller wire sizes for large inverters.
- 48V System: Ideal for high-end solar rigs; requires step-down converters for 12V loads.
3. Sizing Capacity
Battery capacity is measured in amp-hours (Ah). Choose based on energy needs:
- Weekend campers: 100–200Ah
- Extended boondockers: 300–600Ah
- Full-timers with solar: 600–1,000Ah+
Always leave 20–30% margin for inefficiencies and unexpected loads.
4. BMS and Smart Features
Ensure your lithium batteries include a Battery Management System (BMS) for cell balancing, short-circuit protection, over/under-voltage protection, temperature control, or even communications (Bluetooth or CANBus for monitoring).
5. Operating Temperatures
LiFePO₄ batteries cannot charge below 0°C (32°F) unless equipped with low-temperature charging protection or internal heating. If you camp in cold climates, look for models that support low-temp charging.
Pro Tip: Install your batteries in a temperature-stable compartment to extend life and performance.
Part 4: Upgrading the Charging and Monitoring Systems
To make the most of your lithium setup, upgrade or adjust your charging infrastructure.
1. Converter/Charger Replacement
Your RV’s factory converter likely uses a 3-stage lead-acid charging profile (bulk, absorption, float). Lithium requires:
- Bulk/Absorption Voltage: 14.2–14.6V
- Float Voltage: Optional or set to 13.6V
- Equalization: Disabled

Consider replacing your converter with one supporting lithium profiles or programmable charging.
Learn more about different logic of lithium batteries between lead-acid battery
2. Solar Integration
Most modern MPPT charge controllers are lithium-compatible. Set parameters: absorption 14.4V, float 13.6V, low-voltage disconnect ~10.5–11V.
Optimize tilt angle and wiring for minimal voltage drop. A 400W–800W array can sustain a 200–400Ah lithium bank comfortably.
3. Alternator & DC-DC Charging
A DC-DC charger ensures safe, efficient alternator charging by regulating current (preventing alternator overheating), providing multi-stage lithium charging, and isolating starting and house batteries. Install it between your starter and house batteries, ensuring fuse protection on both ends.
4. Battery Monitoring System
Invest in a shunt-based monitor for accurate amp-hour tracking. Essential data points include voltage, current draw, amp-hours remaining, SOC percentage, and charge/discharge cycles. Some advanced monitors connect via Bluetooth or integrate with RV control panels.
Part 5: Installation Best Practices
1. Wiring & Cable Management
Use oxygen-free copper wire with proper gauge sizing (consult ampacity charts). Keep cable lengths short and symmetrical for even load distribution. Use tinned copper lugs, crimped and heat-shrunk for corrosion resistance.
Example: A 200A inverter circuit at 12V requires 2/0 AWG cable for ≤3% voltage drop over 10 ft.
2. Protection Components
- Fuses: ANL or Class T fuses rated slightly above maximum expected current.
- Disconnect Switch: For isolation during maintenance.
- Bus Bars: Simplify multiple connections while maintaining clean layouts.
3. Battery Mounting & Ventilation
Even though lithium batteries don’t emit gases, ensure secure mounting to prevent vibration damage, thermal isolation from engine heat sources, and adequate space for cable routing and BMS airflow.
Safety Note: Avoid mixing new lithium batteries with old or partially degraded units.
4. Testing the System
After wiring: verify correct polarity, power on monitoring equipment, perform a small load test (lights for 15 minutes), gradually add heavier loads and confirm stable voltage above 12.8V, and check charging systems for correct voltage regulation.
Part 6: Maintenance and Longevity
Lithium batteries are mostly maintenance-free, but proper care maximizes lifespan.
1. Charging Tips
- Use compatible chargers with correct voltage settings.
- Avoid charging below freezing without low-temp protection.
- Maintain partial charge (20–80%) for long-term storage.
2. Storage Guidelines
- Store between 5°C–25°C (41–77°F).
- Charge to 50% before extended storage (>3 months).
- Disconnect from loads to prevent parasitic drain.
3. Usage Habits
- Avoid deep discharges below 10–15% SOC.
- Keep terminals clean and tight.
- Periodically verify BMS data for irregularities.
Cost & ROI Analysis
| Factor | Lead-Acid | Lithium |
|---|---|---|
| Usable Capacity | ~50% | ~100% |
| Cycle Life | 300–500 | 4,000–15,000 |
| Weight (per 100Ah) | 60 lb | 30 lb |
| Maintenance | Regular | None |
| Cost per Cycle | $0.30 (approx) | <$0.10 (approx) |
Although lithium batteries cost 3–4× more upfront, their 10× cycle life and higher efficiency make them the smarter long-term investment for many RVers.
Part 7: Common Mistakes & Myths Debunked
Myth 1: “You can use your old lead-acid charger.”
Partially true — it will charge, but not fully. A charger optimized for lithium ensures full capacity and balanced cells.
Myth 2: “Lithium batteries are unsafe.”
Modern LiFePO₄ chemistry is one of the safest energy storage technologies available. Most include BMS protection and certified designs.
Myth 3: “You can’t mix lithium and solar.”
In fact, lithium pairs exceptionally well with solar systems due to high charge acceptance and efficiency.
Myth 4: “All lithium batteries are the same.”
Not true — internal build quality, BMS design, and certifications make a major difference in performance and safety.
Part 8: Tools & Checklists
Essential Tools:
- Multimeter
- Cable crimper & stripper
- Heat gun and shrink tubing
- Torque wrench
- DC clamp ammeter
Pre-Installation Checklist
Post-Installation Checklist
FAQs
1. Can I just swap my lead-acid battery for a lithium one?
Yes — if your converter supports lithium charging or if you install a compatible charger/DC-DC converter.
2. Can lithium batteries power an air conditioner?
Yes, but ensure sufficient capacity (≥300Ah) and an inverter rated for continuous load.
3. What happens if I overcharge or over-discharge?
The BMS will automatically cut off charging or discharging to protect the cells.
4. Do lithium batteries work in winter?
They discharge normally in cold weather but require protection or heating to charge below 0°C.
5. Are lithium batteries worth it for casual RVers?
If you camp only occasionally with hookups, lead-acid may suffice. For boondocking or solar setups, lithium provides clear benefits.
Final Thoughts
Converting your RV to lithium batteries is one of the most rewarding upgrades you can make. You’ll enjoy longer trips, quieter nights, and the satisfaction of energy independence.
With careful planning, proper components, and safe installation, your lithium system will deliver clean, reliable power for years to come — Explore LiTime Lithium RV Batteries


