


When it comes to powering electronic devices, a reliable and efficient energy source is vital. DC to DC chargers, also known as DC-DC converters, play a crucial role in converting one voltage level to another in direct current (DC) systems. This article will delve into the functioning and applications of these chargers, outlining their benefits and how they optimize power conversion for a wide range of devices and systems.
What is A DC to DC Charger
A DC to DC battery charger is a device that utilizes the charging current from a vehicle's alternator to recharge a separate deep cycle battery while driving. This allows users to conveniently recharge their RV or van battery while on the go. The charger works by boosting the charging current from the alternator and directing it to the auxiliary battery, effectively utilizing the power generated by the vehicle's engine. This functionality makes it a convenient and efficient solution for keeping your battery charged during trips.

LiTime 12V 60A DC to DC Battery Charger
DC stands for Direct Current. It is a type of electrical current that flows in only one direction. In DC current, the flow of electrons is constant and does not change direction periodically. This is in contrast to AC (Alternating Current), where the flow of electrons changes direction back and forth in a periodic manner. DC current is commonly used in batteries, solar panels, and electronic devices that require a consistent flow of current in a single direction.
A DC to DC charger, also known as a DC-DC converter or voltage converter, is an electronic device used to convert one voltage level to another in a direct current (DC) system. It is commonly used in various applications such as automotive, solar power systems, telecommunications, and industrial equipment.
The DC to DC charger takes an input voltage from a DC power source, such as a battery or a power supply, and then efficiently converts it to a different output voltage level that is needed for a particular device or system. It provides regulated and stable DC power to ensure compatibility and protect sensitive components from voltage fluctuations.
The primary function of a DC-DC charger is to convert low voltage current into a higher voltage to charge a secondary battery. This charger goes through various stages (bulk, absorption, and float) to efficiently charge the battery.
Why Do You Need a DC-DC Charger?
First, let’s know the differences between RV starting battery and housing battery.
The Differences Between RV Starting Battery and Housing Battery
The main difference between an RV starting battery and a house battery, also known as a service battery or deep cycle battery, lies in their intended purposes and design characteristics.
Starting batteries are designed to deliver short bursts of high power to start the RV's engine. They are typically rated in cranking amps (CA) or cold cranking amps (CCA) and are optimized for providing a significant amount of current for a short period. Starting batteries have a high CCA rating to meet the demands of starting an engine, but they are not well-suited for deep cycling (i.e., discharging and recharging repeatedly). On the other hand, house batteries in an RV, also known as deep cycle batteries, are designed to provide a consistent and reliable flow of power over a longer period. Deep cycle batteries are designed to be discharged and recharged regularly without harming their overall lifespan. They are optimized for deep cycling and have thicker plates that can withstand repeated discharges. House batteries are typically rated in amp-hours (Ah) or reserve capacity (RC) and provide a steady supply of power for RV appliances, lighting, and other electrical systems.
In summary, the main differences between RV starting batteries and house batteries are:
- Purpose: Starting batteries are designed to deliver high bursts of power for starting the engine, while house batteries are designed for deep cycling and providing power over a longer period.
- Design: Starting batteries have higher CCA ratings and thinner plates, while house batteries have thicker plates and are designed for discharging and recharging repeatedly.
- Rating: Starting batteries are typically rated in cranking amps (CA) or cold cranking amps (CCA), while house batteries are rated in amp-hours (Ah) or reserve capacity (RC).
The Purpose of A DC-DC Charger
The purpose of a DC-DC charger is to properly charge your house batteries by converting the output from your primary battery. This is because the charging profile for house batteries is different from that of lead acid batteries. The DC-DC charger acts as the brain that tells your alternator how to charge your house batteries correctly.
DC (direct current) is known for its constant voltage flow and is more efficient and popular in small vehicles like cars, boats, and vans. DC-DC chargers have become important in the context of solar power in vans, as they convert and store power in secondary batteries for various purposes, from charging cellphones to running major appliances such as fridges. If you're a van lifer constantly on the road, the DC-DC charger can efficiently charge your secondary battery, allowing you to power your appliances while traveling.
How Does a DC-DC Battery Charger Work?
A DC-DC battery charger is a device that allows you to charge one battery from another battery, typically with different voltage levels. It works by converting the input voltage from the source battery to the required output voltage for charging the target battery.
The charger consists of several components including a DC-to-DC converter, control circuitry, and sometimes a voltage regulator. The DC-to-DC converter is responsible for stepping up or stepping down the voltage as needed. This conversion may involve using switching techniques such as pulse width modulation (PWM) or buck-boost converters.
The control circuitry monitors the charging process and adjusts the charging voltage and current as necessary. It also ensures that the charging process is efficient and safe. Some DC-DC chargers have built-in battery management systems (BMS) that protect the batteries from overcharging, over-discharging, and other potential issues.
The charger may have various charging modes, such as bulk charging, absorption charging, and float charging. These modes allow for efficient and proper charging of the target battery based on its specific requirements.
Overall, a DC-DC battery charger enables the transfer of power between batteries with different voltage levels, ensuring the target battery is charged effectively while maintaining the necessary charging parameters.
The Benefits of Using a DC-DC Charger
There are several benefits of using a DC-DC charger:
Efficient power conversion
DC-DC chargers are designed to convert the voltage of one direct current (DC) source to another, ensuring efficient power conversion. This means that less power is wasted during the charging process, resulting in more energy being transferred to the battery.
Compatibility with different voltages
DC-DC chargers are often adjustable, allowing them to handle various input and output voltage levels. This makes them compatible with different battery types and sizes, as well as various power sources such as solar panels or vehicle batteries.
Protection features
Many DC-DC chargers come with built-in protection features to prevent damage to the batteries, such as over-current protection, over-voltage protection, and reverse polarity protection. These features enhance the safety and longevity of the batteries being charged.
Flexibility and versatility
DC-DC chargers can be used in a wide range of applications, from charging small electronic devices like smartphones and tablets to powering larger appliances like refrigerators or televisions. They can also be used in off-grid settings or during outdoor activities where access to traditional power sources may be limited.
Faster charging times
DC-DC chargers often provide faster charging times compared to other charging methods. This is especially true for devices with high-capacity batteries, where charging from a low voltage source directly may take significantly longer. DC-DC chargers are designed to optimize the charging process, allowing for quicker recharge times.
Increased battery life
Since DC-DC chargers are designed to provide precise and controlled charging currents, they can help prolong the life of batteries. By delivering the appropriate voltage and current levels, they prevent overcharging or undercharging, which can contribute to battery degradation.
Overall, using a DC-DC charger offers greater efficiency, flexibility, and protection when charging batteries, making it a preferred choice in many applications.
Can I Use a DC-DC Charger with Lithium Batteries?
Yes, you can use a DC-DC charger with lithium batteries. DC-DC chargers are widely used for charging lithium-ion and lithium-polymer batteries. In fact, they are often the preferred choice for charging lithium batteries due to their ability to provide a stable and controlled charging process. With the adjustable voltage and current settings of a DC-DC charger, you can safely and efficiently charge lithium batteries. Just make sure to follow the manufacturer's guidelines and recommendations for charging lithium batteries to ensure their longevity and safety.
What Size DC-DC Charger Should You Get?
The standard DC to DC Charger has the capacity of 20A, 40A and 60A.
Choosing the right size DC-DC charger depends on several factors. For batteries up to 200Ah, a charger with a capacity of around 25Ah is suitable. If your battery capacity exceeds 200Ah, a 40A DC-DC charger would be more appropriate.
Considering the size of your alternator is important. If your alternator has a 200 amp rating, it is recommended to use a charger with half of that capacity (100 amps) to avoid putting too much strain on the alternator.
The type of battery you have also determines the charger size. For conventional batteries like AGM and lead-acid batteries, a DC-DC charger rated at 20% of the battery's amperage is sufficient. However, for lithium batteries, you can go up to 30% of the battery's rated amperage.
Matching the voltage of your charger with your electrical system is crucial. For example, if your system operates at 12 volts, a 12-volt DC-DC charger would be appropriate.
Lastly, consider your energy usage and the number of appliances you are powering with your auxiliary battery. If you have multiple appliances, you will require a DC-DC charger with a higher capacity.

It is always beneficial to consult the manufacturer's specifications and recommendations to ensure you choose the right DC-DC charger for your specific setup.
Where To Install A DC-DC Charger
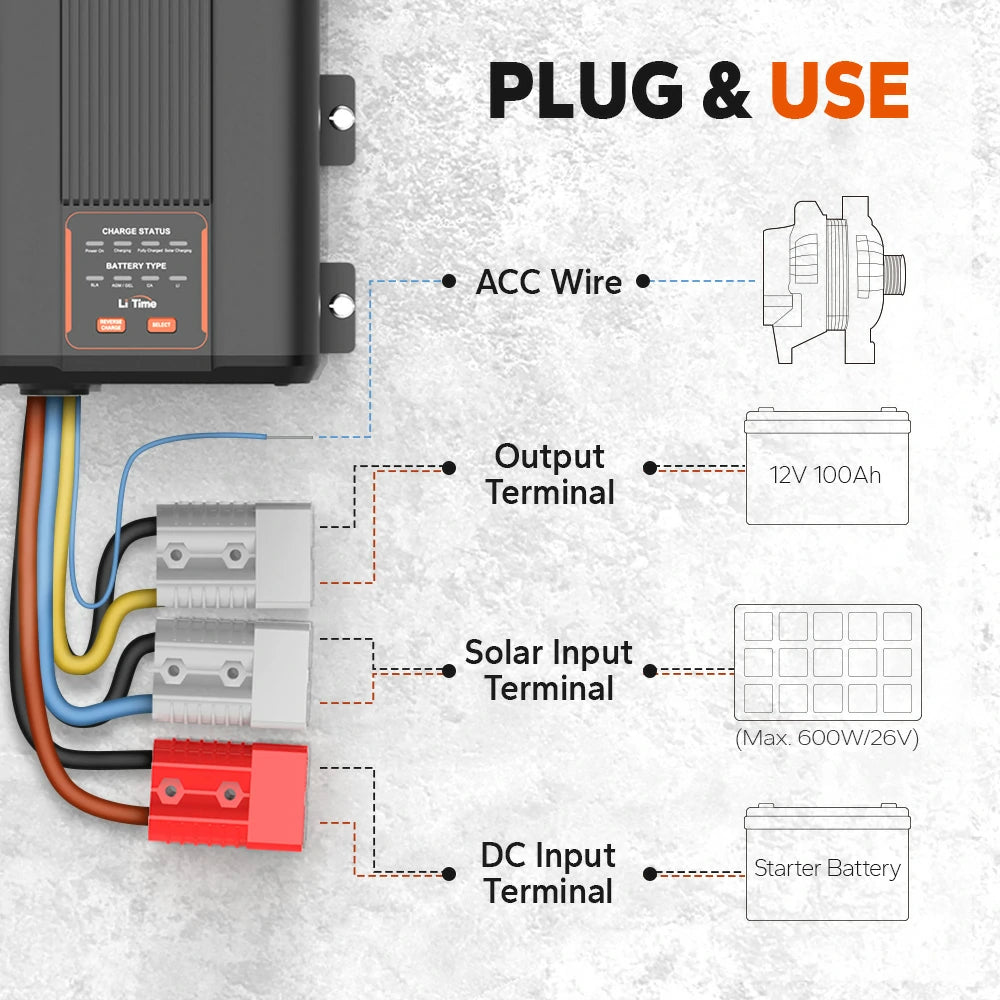
The installation location for a DC-DC charger will depend on the specific vehicle and setup. Generally, it is best to install the DC-DC charger close to the vehicle's starting battery and alternator to minimize voltage drop and maximize charging efficiency. Take LiTime 12V 40A DC-DC Battery Charger for example.
In a well-ventilated, cool, and dry environment.The product must be installed in an area protected from direct sunlight,high temperatures, and water. Make sure there is sufficient room forwiring and ventilation clearance above and below the charger. Clear-ance should be at least 2 inches [5cm].

As close to the battery as possible to the battery you will becharging (service battery).
It could be stand-alone or wall-mounted both horizontally and vertically. Vertical mounting is preferred for optimum cooling.

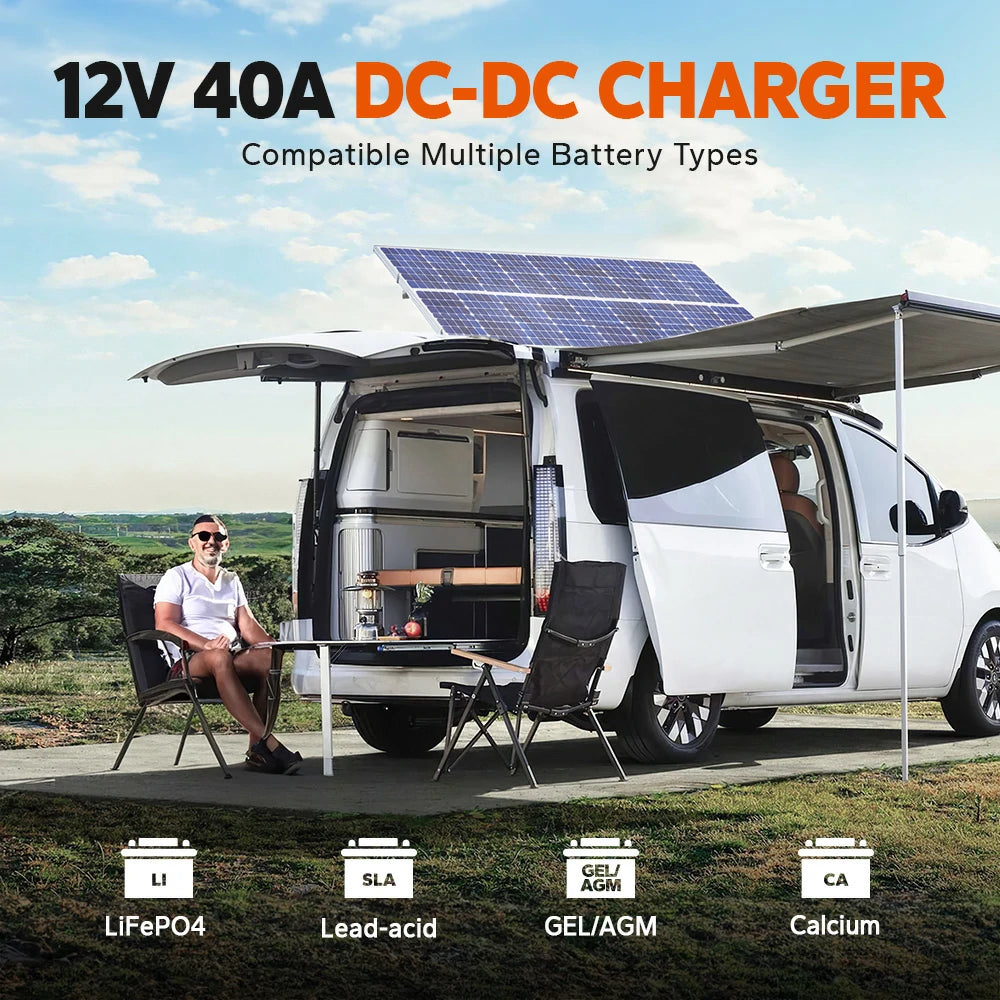
Dual Input DC TO DC Battery Charger With MPPT
LiTime 12V 40A dual input DC to DC battery charger has many advantages than other stander DC DC charter.
Features of LiTime 12V 40A DC-DC Battery Charger
One of the standout features of the LiTime DC-DC charger is its MPPT charging capability, enabling it to harness solar power for charging. This means you can easily charge your batteries using solar panels, making it ideal for off-grid or remote locations.
Additionally, the LiTime DC-DC charger boasts a reverse charging function, allowing your house battery to charge the starting battery in case of emergencies. This feature ensures that you are always prepared, even in the most challenging situations.
Equipped with a display screen and easy-to-use buttons, the LiTime DC-DC charger provides a clear understanding of your battery's charging status and allows you to make direct adjustments to battery modes. This level of control and flexibility is unmatched, giving you complete control over your battery charging process.
Designed with customer convenience in mind, the LiTime DC-DC charger features a plug-and-play design. This means you can easily connect and use the charger without any complicated installation procedures or technical knowledge.
Notably, the LiTime DC-DC charger is suitable for a variety of 12V battery types, including Lithium, Gel, AGM, and Calcium batteries. It ensures a 100% charging capability for all these battery types and can even activate dead lithium batteries at low voltage.
With a maximum power input of 600W and a current output of 40A, the LiTime DC-DC charger is equipped with an ACC wire, a solar input terminal, a DC input terminal, and an output terminal. This comprehensive connectivity enhances the operational efficiency of solar panels, alternators, starting batteries, and service batteries.
Safety is paramount when it comes to battery chargers, and the LiTime DC-DC charger doesn't disappoint. It comes with a range of intelligent charging protections, including reverse input protection, overvoltage input protection, output reverse connection protection, battery overvoltage protection, over-temperature protection, charging timeout protection, and BMS protection for Lithium Iron Phosphate (LFP) batteries.
Is Dual Input DC TO DC Battery Charger Suitable for You?
If you have or plan to install solar panels on your RV or van and want to maximize the charging current from your alternator to charge your house battery while driving, the Dual Input DC TO DC Battery Charger is the perfect solution for you. This charger serves as both a battery isolator/charger and a charge controller, replacing your current charge controller in your system.
It is also ideal if you need to charge an auxiliary battery in your van or truck that powers specific equipment such as a fridge or tools. Additionally, if you use a Folding Solar Suitcase without a built-in charge controller when you are not driving, this charger can still be used to efficiently charge your battery.
For those who live or travel in regions or seasons with limited sun availability, the Dual Input DC TO DC Battery Charger can provide an extra boost in charging current from your alternator. This is particularly beneficial for extended boondocking sessions without the need to add more solar panels.
Overall, the Dual Input DC TO DC Battery Charger is a versatile and reliable solution that allows you to make the most of your solar panels and alternator to efficiently charge your batteries in various scenarios.
Conclusion
With the information shared, you can now make an informed decision and select the perfect DC-DC charger that meets all your requirements.
Choosing a reliable brand like LiTime is crucial in ensuring that you are investing in a high-quality DC-DC charger that will not only meet your needs but also provide long-lasting performance. LiTime has established itself as a reputable brand in the industry, known for manufacturing top-notch charging solutions.
----------------------------------------------------------------------You May Also Like


